Offers to make a miracle invention, known even before our era and first described by Leonardo da Vinci. Its sizes vary from a matchbox to huge halls. Camera obscura is Latin for “dark room.” The device allows you to transfer real images to the screen. True, here’s the bad luck - inverted :) But this is even more interesting. For centuries, artists used the camera obscura to create landscapes until scientists invented chemical compounds that were sensitive to light. This is how the first photos appeared!
See what a masterpiece you can create with a camera obscura.
An upside-down image of New York's Central Park in autumn was displayed on the walls and ceiling. The photograph was taken by Abelardo Morell using a camera obscura. Darken the room, he says, make a small hole for light, and pictures of the world on the other side of the window will take up residence in your home.
Hm... - I don’t know... But the idea is tempting :)
Today we will make a simpler device than the one Morell used. But no less interesting.
We will need:
- Disposable plastic cup (preferably dark)
- Push pin or sewing pin
- Black acrylic paint (can be purchased in bookstores or mix gouache with PVA glue 1 to 1)
- Brush
- A sheet of parchment paper 12x12cm (you can try replacing it with tracing paper or a thin white napkin)
- Stationery eraser
- Candle + matches, flashlight
- Small figures or silhouettes for viewing

What to do:
- Carefully coat the cup with black paint on both sides, let the paint dry

- Make a very small hole in the center of the bottom of the cup using a pin or thumbtack. This will be the lens of a pinhole camera.

- Secure the paper to the cup with a rubber band. It will serve as a screen for a camera obscura.

- Light a candle or flashlight, darken the room and observe the light while holding the glass at arm's length with the screen facing you.
- Look closely and you will see a small crescent-shaped light spot on the dark background of the paper - this is an image of a flame, and it “stands on its head”!
- You can put different silhouettes in front of the flashlight, experiment with distances and shapes, you can turn the silhouettes upside down and get normal images.

How does a camera obscura work? easy to understand from this picture:

Fun ideas:
2. Here are some very good articles with detailed instructions on how to make a homemade camera based on the pinhole camera principle
3. If you attach photo paper to a cup instead of paper, you can get images that you can store and show to friends!
Question: Is the eye similar to a camera obscura? Is it possible?
Finally, a couple more masterpieces from Abelardo Morella :)

A vivid, dream-like and very sharp image of the Brooklyn Bridge and Lower Manhattan materializes above the rumpled sheets. To create this surreal image, Morell set up his camera in a room that served as a camera obscura and left the shutter open for five hours. The vision that emerged was captured on film. Additionally, he used a prism to invert the image.

Color, shape, perspective - everything was mixed up in a multi-colored puzzle created by Morell in the living room of a Venetian house. “I want people to wonder where it came from,” says the artist, who projected a view of the Grand Canale onto a wall where the jungle had already been painted. The hypnotic chaos is completed by the shadow of the chandelier.
With this simple camera you can create unusual pictures in your interiors every day. I dragged it into the quotation book. I immediately wanted to do the same at home. I went looking for what kind of camera this is and it turns out it’s very easy to make
Photography is, in general, a miracle. Art that is created using technical means. And these technical means (cameras) can be fantastically simple. In this article we will tell you how to make a camera obscura (pinhole) using available materials - a matchbox or a tin can.
No need to laugh - such cameras give very interesting pictures, despite their primitiveness. But primitive does not mean bad, because the paintings of ancient people and the sculptures of the great Pablo Picasso were also made using improvised means, and their artistic value is probably not disputed by anyone. Of course, pinhole shooting is not fun for everyone. But any art usually begins precisely where the amateur operates - that is, a person who sincerely likes what he does.
So, what is a camera obscura, and how can one be made? Its main difference from other cameras is the absence of lenses. The role of the lens in the pinhole is played by a hole with perfectly smooth edges, drilled or pierced in the camera body. Some versions of these cameras may use film. Others use photo paper. Most common pinhole camera from a matchbox, to which feeding and receiving film cassettes are attached. Let's tell you in order how to make them.
How to make a camera obscura: option No. 1
A 36x24 mm hole is cut in the bottom of the box. This bottom is a clamping frame for the film. The inner walls of the box are painted black to protect the space for the film from sunlight. A piece of cardboard (shutter holder), also with a cut window, is attached with electrical tape to the outer part of the box with a rectangular window cut in it. And between the shutter holder and the box itself, a shutter made of opaque material is inserted.
The supply and receiving cameras are tightly taped to the body of our camera with electrical tape. Once again we focus on the density of the winding: if there are gaps, the photographs will not turn out! The supply cassette contains fresh, unused (unexposed) film. You can buy a standard charged cassette or charge it yourself (such cassette devices are found in some models of old Soviet cameras). As for the receiving cassette, similar devices are also found in some older cameras.
And finally, the last stage - a piece of foil with a tiny hole pierced with a needle is glued onto the box, which should be located in the center of the 36x24 mm hole cut in the lid. The edges of the small hole should be as smooth as possible. Film is loaded into the camera and the box is closed. All! You can shoot. One detail - take pictures with pinhole cameras better at long exposures. And then the result will be amazing.
How to make a camera obscura: option No. 2
The second version of the pinhole camera, which we will talk about here, is very simple. To create it you just need cardboard, scissors and glue. It is better that the cardboard from which the camera box is assembled is black on at least one side. Why is this necessary? Black color neutralizes any internal reflections as much as possible. The insides of a regular camera are traditionally black for the same reason.
If the material for your experiments is a ready-made box, you should paint it on the inside with black paint, just like in the first version of the pinhole, which we have already told you about here. The already assembled product is carefully taped with black tape to prevent insidious sunlight from reaching the film, which can expose it.
To make the box we will need three cardboard rectangles 10x12.5 cm, two rectangles 12.5x12.5 cm, one 12.5x15 cm, two strips 2.5x12.5 cm and two 2.5x10 cm.
- First we make a removable camera back. It is assembled from a 12.5x15 cm rectangle and a 2.5 cm strip. In the middle of the rectangle, draw a 10x12.5 cm rectangle. We use a ready-made template. Place a 2.5 cm strip along the drawn lines and fasten with small pieces of tape. Checking the internal size. It should be 10x12.5 cm. This is necessary so that the film fits freely. The joints must be properly taped with black tape.
- Making a camera box. Place the front of the camera with the black side up. We lay two 12.5x12.5 cm rectangles and two 10x12.5 cm rectangles close together.We glue them together with tape. Then we assemble the box and put the backdrop inside. The box is secured around with a rubber band. This ensures that the backdrop fits tightly into the box. Use several pieces of tape to secure the box to ensure proper gluing. All corners are carefully taped with the same tape.
- Let's drill a hole. A small square piece of metal (bronze, aluminum, or other thin metal) is taken and placed on a wooden or cardboard backing. A nail is inserted into the eraser of the pencil and a hole is gradually drilled. One little trick - the pencil should be held vertically. If the hole is uneven, this will affect the quality of the picture.
- Connect the square to the hole.We attach a piece of metal with a hole to the box of our camera with tape. For the shutter, glue a piece of tape at one end. When lowered, it will close the hole and act as a shutter. That's it, the pinhole camera is ready to take magical pictures.
Good luck! - This
After reading a number of articles about pinholes (aka, aka), I had a desire to do something like this. This desire took a long time to mature, but it finally matured and I began to make a camera.
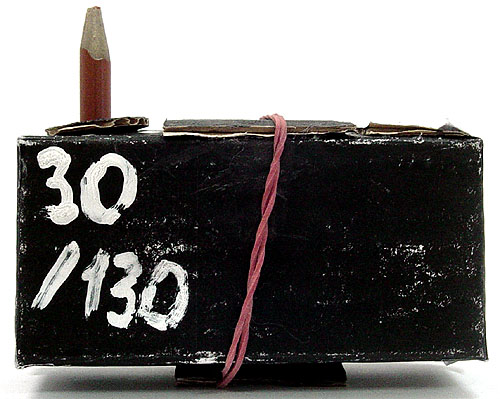
I decided to make it from cardboard, because... This is the most affordable material, and there is less fuss with it than with wood. I thought through the design as it was being created, so that shortcomings had to be corrected as they were discovered. I made a hole in the tin with a very ordinary pin - I took the thinnest one I could find at home and pierced it. I didn’t do any diameter measurements or any grinding of the tin. The result was a camera with a focal length of ~30 mm and an aperture of ~f/130 - a table of shutter speeds was generated on the website for these parameters.

Front view: shutter closed. The role of the shutter is performed by cardboard, unpainted on one side. The pencil is used to rewind the film.

Front view: shutter open.
Back view.

Working part of the camera: a roll of film is inserted into the right compartment, the tail of the film is glued with tape to a pencil, in the middle there is a window measuring 36 x 24 mm (approximately).

The working part of the camera - top view: the hole on the right is intended for the protruding part of the coil.

The camera is in disassembled condition.
Today we will tell you how to make such a pinhole camera from your own room. Most often this device is called " camera obscura", which means “dark room” in Latin. In fact, it is the “dark room” that we will create. First, we cover the window with thick material. We used large pieces of cardboard, but in the end the light insulation was insufficient and we had to additionally seal the cracks with regular food foil.
Sealing the cracks turned out to be such a tedious task that it would probably be easier to just cover the window completely with foil and not bother with cardboard. It is lighter than cardboard and holds better (regular tape is enough).
So we created a completely dark room, which, by the way, is very useful on white nights. All that remains now is to let light through a small hole. Here we are faced with a choice. The smaller the hole, the sharper the image, but at the same time darker (less light passes through). As the aperture is enlarged, the brightness of the image increases, but the sharpness decreases. We chose a hole approximately equal to the diameter of a ten-kopeck coin.

That's it, the camera is ready. On the wall opposite the window you get this inverted image of the street.

In this image, the brightness approximately corresponds to the brightness that we observed. All this was done in winter, when there is always little light outside, but in summer the image would, of course, be brighter. In order to better distinguish the details, we will demonstrate an image taken at a longer shutter speed.

For good perception, it is better when the walls are painted evenly. We didn’t repaint the walls or tear off the wallpaper, but for more comfortable viewing, we projected the image onto a gray screen.

Of course, you can see the image not only on the wall opposite the window, but also on the remaining walls, as well as on the ceiling and floor. In this photograph, for example, you can see a car parking lot near the house, which was projected on the ceiling in close proximity to the window.

Parked cars and the path are clearly visible. It is very convenient to lie on the bed to check if the car has been stolen. In addition, such an image will not cause much discomfort due to its inversion, as happened with the houses in the previous photographs. It all looks quite funny, like a movie on the big screen.
Good luck with your experiments!
The laws of electrostatics, optics and mechanics can be studied using homemade instruments.
The coils are inserted into one another (secondary into primary) and fixed on a dielectric stand. Install a spark gap on top of the secondary coil. As a rule, this is a toroid, that is, a tube rolled into a ring. This could be an aluminum corrugated pipe of the kind that is used for hoods and sold in hardware stores.
Now look carefully at the coils you just made, and remember that in working condition you should never touch them with your hands, otherwise you will be left without hands and everything to which these hands are attached. But the sparks themselves are relatively safe, you can touch them, just keep in mind that they are quite hot.
Remember also that the Tesla transformer should be kept away from electronic devices such as a computer and mobile phone.
Since the voltage of a household outlet of 220 volts is low, you need to increase the voltage to at least 2-3 kV (kilovolts) using a transformer. It is connected to the coils via a capacitor.
In order for longer lightning bolts to come from the toroid, some kind of pin must be installed at some distance from the coils. You can bring a wire or a screwdriver, or even just catch the discharges with your bare fingers. If you bring a light bulb to the toroid, it will begin to glow.
If you are still lazy or afraid to make such a sparkling device, then ready-made plasma lamps are sold, also invented at one time by Nikola Tesla - glass balls, inside of which there is an electrode and rarefied gas.
Optics: camera obscura
The camera obscura is the predecessor of modern cameras. It's much easier and safer to make than a Tesla coil.
There are two options. The first is to turn the entire room into a camera obscura. It is desirable that the walls of the room are free and white, and the windows face the sunny side.
The windows of the room should be tightly covered with a shield of plywood or cardboard covered with black paper, so that light does not leak anywhere. Drill a tiny hole in this shield, about the size of a peephole. A color image of the landscape outside your window will appear on the opposite wall. Only the image will be upside down. If the hole is too small, the picture may appear too blurry.
This experiment demonstrates that light travels in straight lines. The rays penetrating the small hole intersect and turn over.
One photographer, Abelardo Morell, even turned the pinhole camera principle into an art project. He travels around the world, making pinhole cameras out of rooms and photographing landscapes that appear on the walls.
A small camera obscura can easily be made from a tin, or better yet, from a cylindrical box of Pringles chips. On one side, a neat hole is pierced with a needle, on the other, the bottom is sealed with thin translucent paper. The camera obscura is ready.
But it is much more interesting to take real photographs using a pinhole camera. In a matchbox painted black, cut a small hole, cover it with foil and pierce a tiny hole no more than 0.5 mm in diameter with a needle.
Pass the film through the matchbox, sealing all the cracks so as not to expose the frames. The “lens”, that is, the hole in the foil, needs to be sealed with something or covered tightly, simulating a shutter.
Mechanics: steam engine
The operating principle of a steam engine is quite simple. True, such a device will be purely decorative. It is usually made by fans of steam punk.
You need to take a tin can. A beer or cola can will do. Make a hole in each of the bottoms. Pull a metal tube through the holes. The open ends of the tubes - the nozzles - can be slightly narrowed.
Place the structure on the stand and fill it with water. There should be enough space under the jar for a candle.
Light a candle or a tablet of dry fuel under the jar. When the water boils, steam will come out of the nozzles and the structure will begin to spin.
Instead of a jar, you can use a chicken egg. Pierce a hole with a diameter of 5 mm in it and pour out the contents. Then fill with water and place over a small candle.
Here is an example of a more complex steam engine:
Hydrostatics: Heron's Fountain
The easiest way to make a decorative fountain is to buy an electric aquarium pump and connect a hose to it. The hose and pump need to be run into a wide vase or pot and filled with water. The end of the hose can be disguised as a sea shell with a hole drilled in it.
Not that getting a camera is a problem these days. On the contrary, almost everyone has such an opportunity. Many are content with cameras in their phones, many spend a lot of money on semi-professional or professional cameras, and many are interested in Lomography, which is not only fashionable, but also affordable.
Therefore, of course, a homemade camera is not a forced measure, but an interesting experiment and (which, it seems to me, is even more important) an opportunity to do something with your own hands and see the amazing result of your work.
In order to make a camera obscura, you must follow the instructions:
1. Take any container/box/tin can or, as in the illustration, a film can, a thin needle, a piece of foil, electrical tape (black tape) and black and white (!) photo paper (for example KODAK Professional Polymax II RC) or slide film (for example Kodak Ektachrome E100 GX).
2. Use scissors to cut a hole in the middle of the box. 
3. The resulting hole is much larger than the pinhole hole. 
4. Cut out a piece of foil that will completely (and with a margin) cover the hole. 
5. Make a small hole in the middle of a piece of foil with the tip of a thin needle. 
6. The surface of the foil should be smooth, so remove any irregularities with sandpaper. 
The smaller the diameter of the hole, the better the photo will be.
7. To avoid light reflections inside the container, it and the foil on the inside should be painted with matte black paint. 
8. Tape the foil to the container with tape. 
9. Cover the hole with a piece of tape to prevent light from entering prematurely. 
10. In a dark room (!), insert photo paper into the container so that it does not cover the pinhole. 
11. If all holes are securely closed, the camera is ready to use! 


"pros" and "cons" of democracy
Surveyor. Who is a surveyor? Description of the profession. Profession surveyor Surveyor training
Magellanic clouds: who are they?
Pepper Steak Sauce Creamy Pepper Sauce
How to create a competent portfolio for a designer